Guidelines and steps for uploading a tax invoice to your Cloudfloat account
To ensure an efficient and streamlined experience, please remember the following when uploading a tax invoice to your Cloudfloat dashboard:
The Do’s
● Contains the words “Tax Invoice”
● Has the name, address, and ABN number of the supplier
● Has the name of the purchaser
● Shows the GST amount separate from the total
● Has a due date and payment terms
● Includes supplier’s bank details
The Don'ts
● Don’t upload a statement (if a Tax invoice can be provided, we will accept it)
● Don’t upload proforma invoices, sales orders or order confirmations
● Don’t upload handwritten invoices
● Don’t upload tax invoices that are more than 60 days past due date
● Don’t upload invoices for rent, travel, wages, utilities, political items, gambling and credit restoration services.
Steps in Uploading Tax Invoices
STEP 1
Log in to our Application using the email address and password registered to your Cloudfloat account.
● If you have forgotten your password, please opt to reset it.
● You can access the app through a computer, tablet or smartphone
STEP 2
Once logged in, you will land on the app homepage dashboard, from here you will see your new Cloudfloat top-up wallet at the top right hand side of your screen. You can top this up with the required amount to pay off your invoice by pressing the ‘Top Up’ button and selecting the amount you would like to top up and click ‘Confirm’. You can also set up a recurring auto top-up in your account settings.
STEP 3
To upload a tax invoice on Cloudfloat, go to the ‘Pay’ section on your dashboard. Navigate to the ‘Upload Invoice’ button and click on it. Next, select the invoice you would like to upload from your device. *Please ensure you upload your invoice in a recognised image file format, if you encounter any issues during your upload, compress the file and make sure all the information is correct before submitting
STEP 4
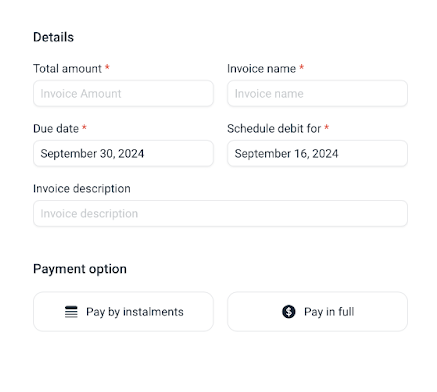
Once uploaded, you'll need to fill out the required invoice details. It’s important to ensure the details you enter match the information on the invoice exactly, otherwise it won't be approved for processing.
Your debit date cannot be scheduled before your due date, double check these details are aligned before selecting your payment option.

STEP 5
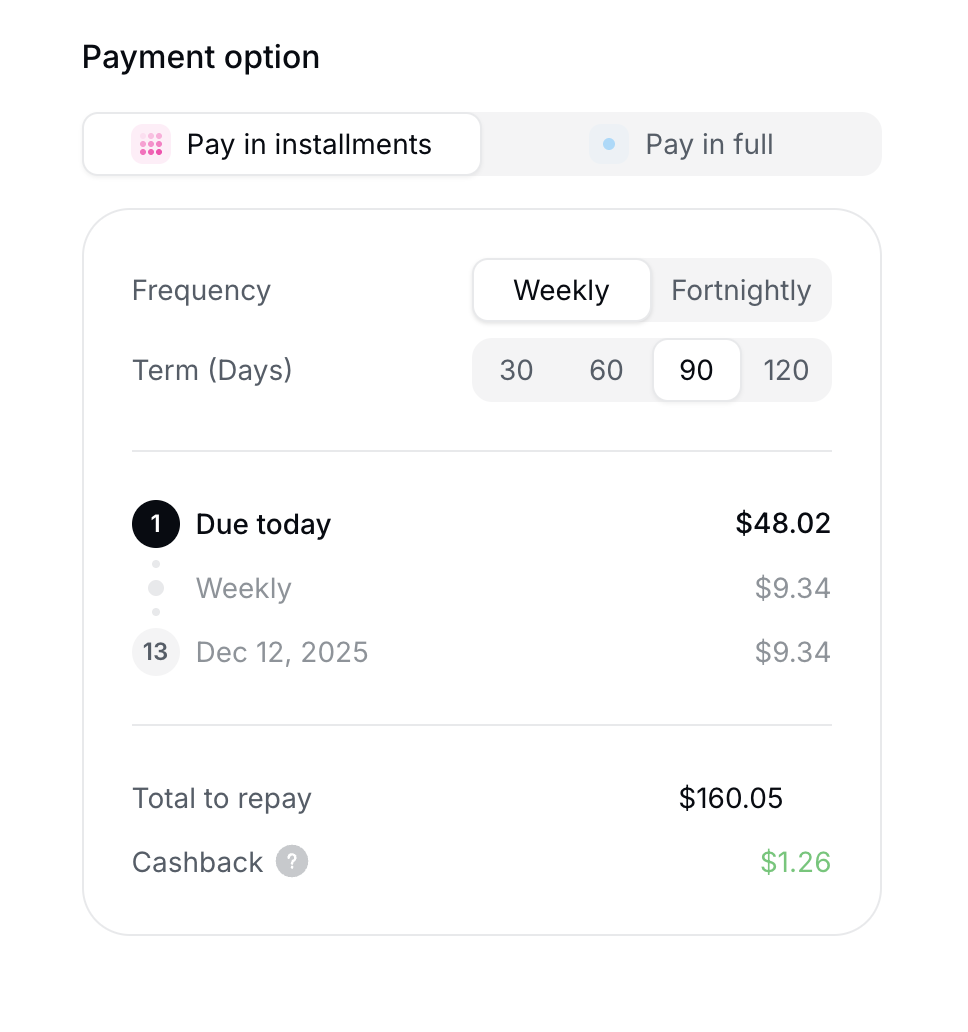
After double-checking that all the invoice information is correct, select your payment plan. You have a choice of paying by instalments or paying in full. If you select pay by instalments, you will need to select how often you would like to pay back and over what period of time. Once the frequency and repayment terms are selected, you will see a breakdown of the repayment schedule and any associated fees.
You will also see a cashback amount, this will be what you earn back from paying off your invoice processing fees. Once satisfied click ‘Agree & Submit’ and your invoice will be sent for review.

STEP 6
After submission, your invoice is under review and you will be notified within 24 hours if it is approved or rejected. You can check on the status of your invoice in the ‘Pay’ dashboard. There’s four different status types: In review, canceled, scheduled, paid.
STEP 7
If your invoice is approved, you can check the invoice details, payment, schedule, remaining balance and fees at any time. Just click on the specific invoice in the ‘Pay’ section to see the details.
*In the event of a canceled invoice, you will be notified by email of the cancellation reason and be instructed to either re-upload the invoice correctly or look for alternative payment solutions.
